Roll back a Zesty Disk filesystem
This topic describes how to roll back (stop Zesty’s management of) a Zesty Disk filesystem.
Note
When a filesystem stops being managed by Zesty, it will no longer automatically expand and shrink.
To roll back, you remove the Zesty Disk Agent from the instance. All Zesty Disk filesystems attached to that instance will no longer be managed by Zesty.
Before removing the Zesty Disk Agent, you can use the zestyctl EZswitch feature to migrate the filesystem data to a different filesystem and redirect the mount point from the Zesty Disk filesystem to the new filesystem. This is described in Migrate the data to a different filesystem.
After you remove the Agent, migrating the data will need to be done manually, as the EZswitch procedure does not work without the Agent.
Remove the Zesty Disk Agent
This procedure removes Zesty Disk management at the instance level. The current filesystem will remain.
Before uninstalling the Agent, note the following:
All attached Zesty Disk filesystems will no longer be managed by Zesty.
Future migration of the filesystem data will need to be done manually. EZswitch migration (in supported operating systems) has minimal downtime, whereas manual migration can cause downtime of several hours or more depending on the size of the filesystem.
Prerequisites
For Linux: Root CLI access to the instance
For Windows: Remote access and permissions to run PowerShell commands on the instance
To remove the ZD Agent:
To remove the Agent v6.8.0 or later on a Linux instance, run the following command on the instance:
zestyctl uninstall
A confirmation message is displayed.For Agent versions earlier than 6.8.0, use the Linux package manager to remove zesty-agent
To remove the Agent on a Windows instance, run the following commands in a PowerShell window:
$collector = (Get-WmiObject -Class Win32_Product | Where Name -Like "Zesty Collector*")if ($collector) {$null = $collector.uninstall()}
If you’ve uninstalled the Agent from all instances, you can remove the Zesty IAM role in AWS.
Migrate the data to a different filesystem
This section describes how to use the Zesty Disk EZswitch feature to migrate the data from a Zesty Disk filesystem to a non-Zesty Disk filesystem. EZswitch can only be performed before removing the Zesty Disk Agent.
This procedure removes Zesty management at the filesystem level by:
migrating the data from the Zesty-managed filesystem (source) to a new, non-managed filesystem (target)
redirecting the mount point from the source filesystem to the target filesystem
EZswitch requires 2 instance reboots. The reboots can be done automatically as part of the rollback or can be done manually. Either way, the rollback operation is paused until the reboot is done.
Prerequisites
User access to the Zesty platform and the Zesty API Key
For more information, see Find your Zesty API key.AWS account integrated with Zesty
For more information, see Integrate your AWS account with Zesty.Root CLI access to the instance where the Zesty Disk is attached
The AWS serial number (volume ID) of a new, clean EBS volume:
of equal or greater size than the current filesystem
attached to the instance where the source Zesty Disk filesystem is attached
not mounted
Limitations
The zestyctl EZswitch feature does not support the following:
Rolling back more than one filesystem on the same instance, at the same time
Linux-based instances running RHEL v8.0 or v9.0 or Rocky v9.3 or v9.4
Windows-based instances
Instances with a Linux filesystem based on Logical Volume Manager (LVM)
This list is not exhaustive and is subject to change without notice.
To roll back a Zesty Disk:
Connect to the instance with CLI root access.
Install the latest Zesty Disk Agent, by running the following command on the instance:
curl -s https://static.zesty.co/ZX-InfraStructure-Agent-release/install.sh | sudo bash -s apikey=<API_KEY>
Where <API_KEY> is the API key from the Zesty platform. To get your API key, see Find your Zesty API key.Identify the device name of the target EBS volume that you created by running the following command:
lsblk -o NAME,SERIAL,MOUNTPOINT -n | awk '$2 ~ /^vol/ {print $1,$2,$3}' | sed s/vol/vol-/g
The output displays a list of device name, AWS serial, and the mount path (if the volume is mounted). For example: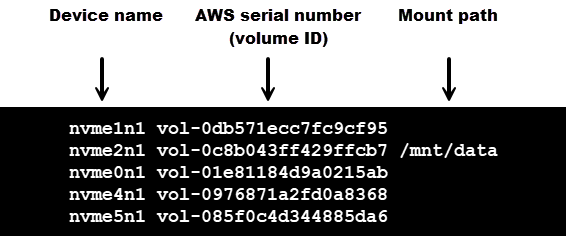
In this example, the target’s AWS volume ID is “vol-0db571ecc7fc9cf95,” so its device name is /dev/nvme1n1. From now on, whenever device_name is mentioned, it will refer to /dev/nvme1n1.
In the next step, we will determine which of the listed devices are part of the Zesty Disk filesystem.Identify the volumes that are part of the source Zesty Disk filesystem, by running the following command:
btrfs fi show <mount_point>Where <mount_point> is the mount point shown in the
lsblkcommand
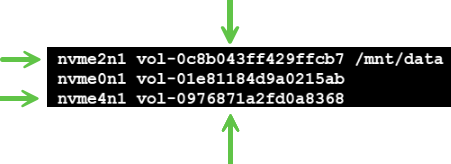
For example:btrfs fi show /mnt/data
The output shows the UUID of the filesystem and the list of device names:Label: none uuid: db87b2c6-d2fb-47be-b7c3-0e1130ec6c37 Total devices 2 FS bytes used 192.00KiB devid 1 size 15.00GiB used 276.00MiB path /dev/nvme4n1 devid 2 size 40.00GiB used 0.00B path /dev/nvme2n1In this example, the source filesystem mounted on /mnt/data consists of the volumes /dev/nvme2n1 and /dev/nvme4n1. Based on the output from the lsblk command, the AWS volume IDs of those volumes are vol-0c8b043ff429ffcb7 and vol-0976871a2fd0a8368, respectively.
 These are the source volumes whose data will be migrated. After the migration is complete, you can delete these volumes from AWS.
(Optional) In AWS, take a backup of the source volumes in the previous step, using a snapshot.
Start the rollback process by running the following command:
zestyctl disk ezswitch start <mount_path> <device_name> --filesystem <new_filesystem_type> [--auto-reboot]
Where:<mount_path> is the mount path to be redirected
<device_name> is the device name of the target EBS volume with the /dev/ prefix, in our example /dev/nvme1n1
<new_filesystem_type> is the filesystem to create on the target volume, for example ext4 or xfs
(Optional) To reboot the instance automatically during the migration process, add the
--auto-rebootargument.
Example:
zestyctl disk ezswitch start /mnt/data /dev/nvme1n1 –filesystem xfs(Optional) To check the status of the rollback, run the following command:
zestyctl disk ezswitch status
Output similar to the following is displayed: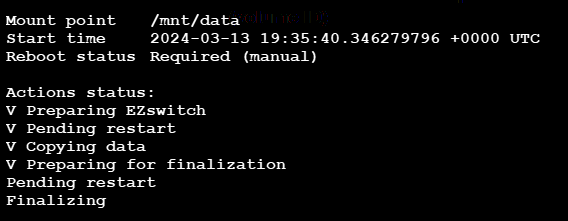
In this example, 4 steps were checked as being completed, and the rollback is currently paused until a manual reboot is done. You can reboot using the CLI, from AWS, or from the Zesty platform.
After the reboot, the rollback will resume.When the rollback completes, the
zestyctl statuscommand will return the following output:No ezswitch is running(Optional) You can cancel an ongoing EZswitch rollback by running the following command:
zestyctl disk ezswitch abort <mount_path>Canceling will stop the migration of data to the target disk, unmount the destination disk, and revert all system settings.Important: Canceling a rollback is only allowed before the first reboot.
(Optional) Validate the process:
To validate the volume and the mount point, run the following command:
df -h <mount_point>
Output similar to the following is displayed:

Where <device_name> and <mount_point> are the same as the ones from step 6 above indicating that the mount point is now on the target device.To validate the filesystem type, run the following command:
lsblk -o NAME,FSTYPE,MOUNTPOINT,UUIDThe output will include the device name, for example /dev/nvme1n1, the filesystem type, for example xfs, and the mount_path.
If the mount should be persistent, add it manually to /etc/fstab using the UUID discovered at the previous section. For more details see https://wiki.archlinux.org/title/fstab
(Recommended) Perform a cleanup in AWS:
Detach the original source volume from the instance.
Find the volume ID as described in step 4.After verifying that the rollback was successful, you can delete the volume.
If you made a backup snapshot before beginning the rollback, verify the rollback, and then delete the snapshot.
Repeat this procedure on every filesystem to be migrated.