This topic describes how to run EZswitch on a Linux instance from the Zesty platform.
Before beginning EZswitch, ensure that your environment is supported, as described in the “Limitations” section of How EZswitch works on standalone instances.
Prerequisites
The steps described in Before you deploy on standalone instances
If the installed Agent is not the most recent version, you cannot run EZswitch. First update the Agent by installing it again, as described in Install the Zesty Disk Agent on standalone instances.A mounted volume with data to be migrated
An instance with a clean volume (not the root volume), that meets the volume, instance, and network settings described in System requirements
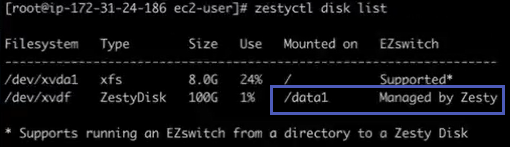
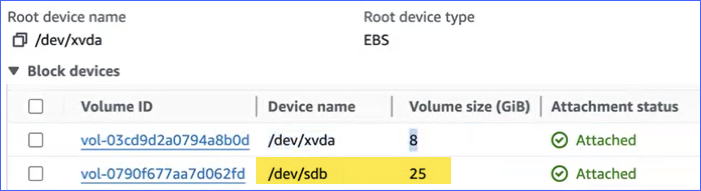
In the following example, our data is at mount point /data1, a supported EXT4 filesystem on a 25GB volume, /xvdb.
Throughout this procedure, you can expand the accordion boxes to see further insights into what’s going on in the background.
Click here to see the filesystem before beginning EZswitch
On the Zesty platform:
Using zestyctl disk list:
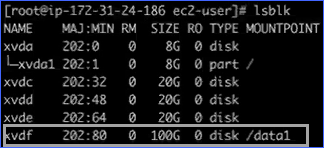
Using lsblk:
On AWS:
To run EZswitch from the Zesty platform:
From the Zesty platform main menu, select Zesty Disk.
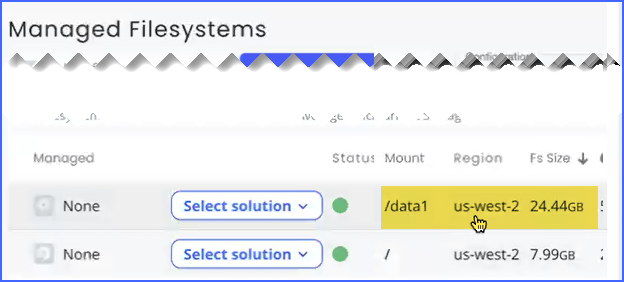
From the Managed Filesystems tab, identify the filesystem where the data is located then click Select solution > Install Zesty Disk.
Note: this option will not be displayed unless the installed Agent is the most current version. To update the Agent, install it again, as described in Install the Zesty Disk Agent on standalone instances..png)
The EZswitch wizard starts:
.png)
The time estimate depends on the amount of data to migrate.
(Optional) To perform automatic restarts, select Automatic Restart.
You can then specify when to do the restarts, like during a maintenance window. In this example, we will show manual restarts from the UI.
(Recommended) To automatically remove the old volume after completion, select Remove old volume and enter the number of days before removal.
In AWS, you still pay for the old volume until it is removed.
(Optional) To skip the creation of a snapshot, select Do not create snapshot.
(Recommended) If a snapshot is being made, to automatically remove the snapshots, select Remove Snapshot and enter the number of days before removal.
Click Start.
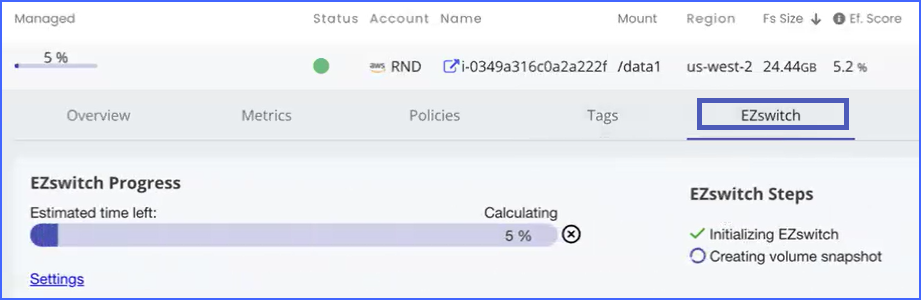
In the expanded view of the filesystem, click the EZswitch tab:
To modify the restart and remove options, click Settings to return to and modify those options. You can change the selections any time before the first or second restart.
EZswitch begins with your server initiating communication. This may take several minutes.
You can cancel EZswitch by clicking X to the right of the progress bar. You can cancel as long as the instance has not yet been restarted.
The preparation steps continue in the background until the first restart is required.
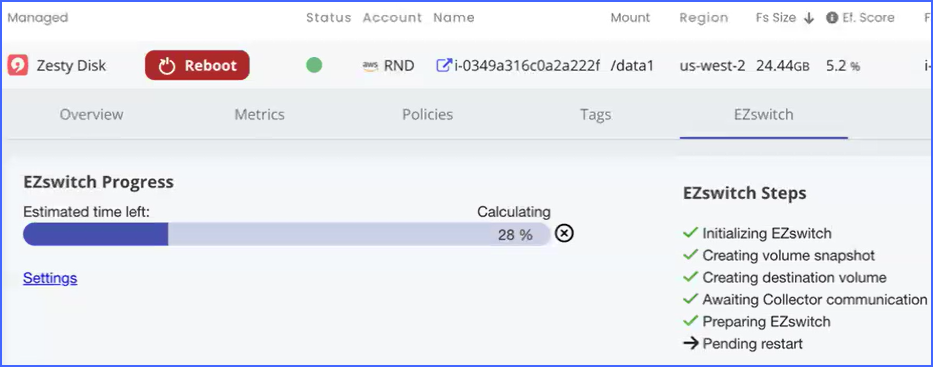
When it’s time to restart (“Pending restart”), click Reboot (or reboot another way).
After the restart, all new data will be written to the Zesty Disk and the old data will start to be copied to the Zesty Disk. The time to complete the copying is determined by the amount of data to be transferred.
After the first restart, the name of your original mount point will change, and in its place you will see two mount points: _old (the original mount point) and _new (the Zesty Disk).
Note: _new has a small initial size, and it will increase, as needed.

During the data transfer, application reads and writes continue as normal under the original mount point name.
The Zesty Disk starts small, and then automatically expands as data is copied to it.
To see the temporary mount points on the instance, click here
You can see the mountpoints on the instance using
lsblkandzestyctl disk list.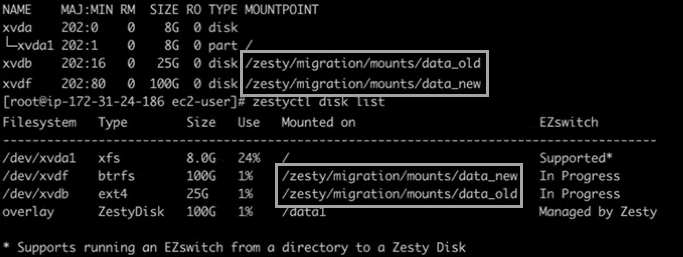
When all the data is copied, you are prompted to restart.
Click Reboot (or reboot another way).
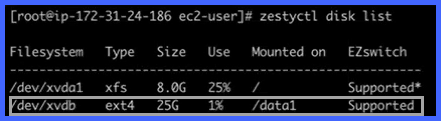
After the second restart, you can see the following changes:
The temporary mount point names (_old and _new) are removed.
The old mount point (25GB) is no longer shown in the Managed Filesystems table.
The original mount point name has been returned and is now on a Zesty Disk filesystem!
.png)
The old volume is no longer used, but is still in the AWS account, and you will be charged for it until you remove it. You can remove it manually, or you may have configured it to be removed automatically when starting EZswitch.
Congratulations! Your volumes are now being managed by Zesty Disk.
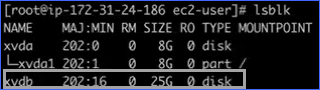
To see the mount points after EZswitch has completed, click here
The original /data1 mount point on xvdf has returned to its original name:
Now, it’s managed by Zesty: