This topic describes how to create a new Zesty Disk filesystem on a clean volume attached to a Windows instance.
After the completion of this operation, you have a new Zesty Disk mount point that will expand and shrink automatically.
Prerequisites
User access to the Zesty platform
Remote access and permissions to run PowerShell commands on the instance with the created, empty volume
The Zesty Disk Agent is running on the instance
In the following procedure, we’ll use this beginning filesystem:
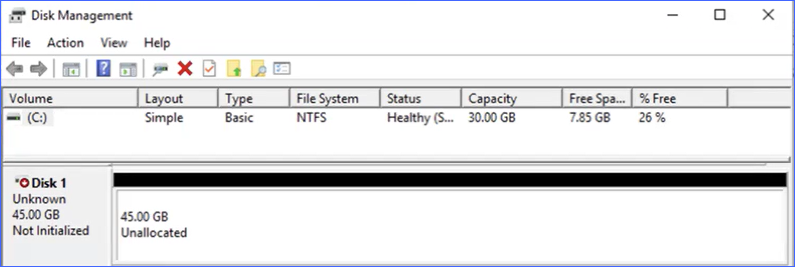
Disk 0, the C: drive, is the system disk. That disk is not involved, so it was removed from all the figures.
To create a new Zesty Disk filesystem:
From the Zesty platform main menu, select Zesty Disk.
From the Managed Filesystems tab, click Install agent.
In the Install agent dialog, expand the Windows dropdown and copy the second command.
Connect to the prepared instance.
Open a PowerShell window.
In the PowerShell window, assign a drive letter to the Zesty Disk, by pasting and running the second command on the instance:
C:\zesty\collector\zmount.exe -driveLetter <DRIVE_LETTER> -diskNumber <DISK_NUMBER>Where:
* <DRIVE_LETTER> is an uppercase letter that is available to assign to the drive
* <DISK_NUMBER> is the number of the disk from Windows Disk Management
For example, to assign D to disk 1:
C:\zesty\collector\zmount.exe -driveLetter D -diskNumber 1Note that commands are case-sensitive.
When the process succeeds, a message, similar to the following is displayed:
Zesty Disk successfully created on the drive letter ‘D’.
The new volume is shown in Disk Management: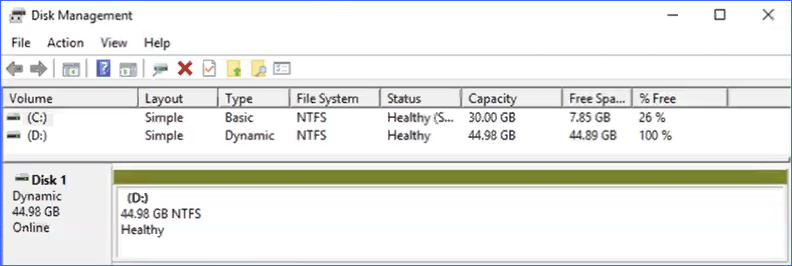
After the Agent reports back, you can see the new Zesty disk mount point in the Managed filesystems tab. You may have to click Reload:.png)
The new Zesty disk (A) has a capacity of 45 GB (B). Zesty took a 20 GB mount point and added an additional 25 GB mount point to enable expansion for user writes.
Congratulations!
If the volume needs to expand, for example, to account for the default buffer, it will automatically expand to 128 GB, as follows:
You’ll be able to see this in the Zesty Disk Managed filesystems tab when the Agent reports.
When an additional expansion is necessary, another volume will be created on Disk 2 in chunks of 128 GB.
The following figure shows that the expanded volume, D, is now a spanned volume: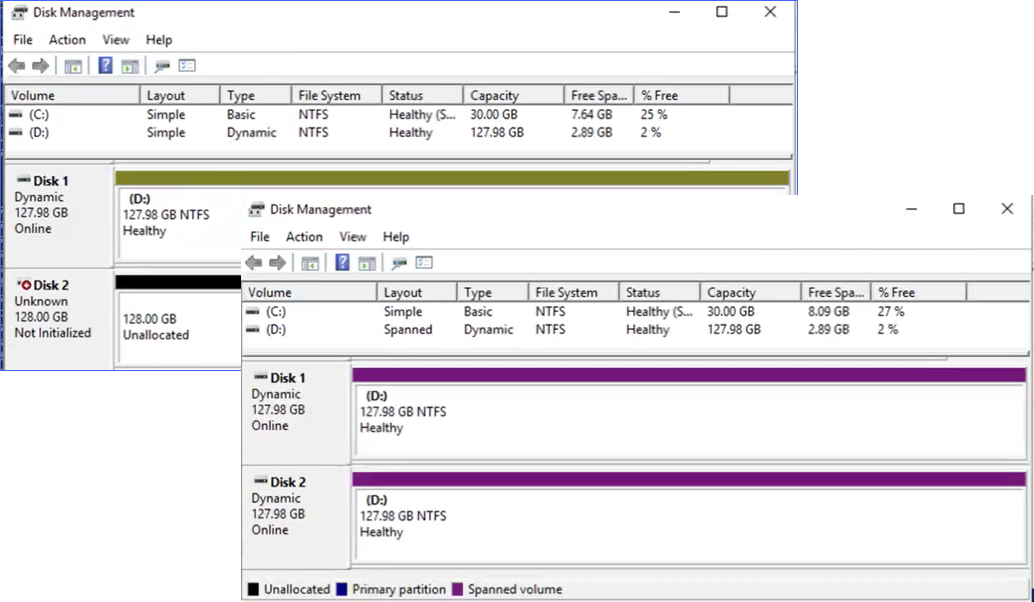 The following figure shows the volumes on the AWS:
.png)