This topic describes how to use Helm to install the Kompass agent (“agent”). After installing the agent, the cluster is “connected” for Zesty Compute Optimization.
The agent provides visibility into your Kubernetes cluster and workload costs, scaling performance, usage, and pattern history. With agent visibility, Compute Optimization can make recommendations for your environment.
The agent collects cluster data in read-only mode. Its ClusterRole permissions and helper permissions define the Kubernetes resources and actions it can access.
For optional configuration, including credentials, storage, VictoriaMetrics, custom pricing, and node placement, see Advanced Kompass agent configuration.
Bash commands
The commands in this topic are written for Bash. If you use a different command-line shell, adapt the commands for that shell.
Install the agent
Prerequisites
AWS account has been integrated with Zesty.
The administrator client on which the Insights agent will be installed must be able to use the following:
Helm v3.14, or later
Required permissions
Agent permissions
To install the Insights agent on an EKS cluster:
The commands in this topic are written for Bash. If you use a different command-line shell, adapt the commands for that shell.
Select cluster and verify content:
From the Kompass > Clusters page, click Connect Insights agent on the row for the cluster to connect.
To connect multiple clusters, click Connect clusters.
The Connect cluster wizard is displayed.Select the cluster on which to install the agent.
When you start typing, matching clusters are displayed.
Ensure your local terminal client is actively authenticated to this same AWS cluster context using the AWS CLI andkubectl.
Prepare values.yaml:
Define the following parameter values:
cert-manager: If you select No, it will be installed.
PVC storage class
Agent auto-update (optional):
To edit the agent version and update time, click Edit auto update settings.
For more details about the parameters, see How the cluster connects to Kubernetes resource optimization.
Click Next.
The next step of the wizard is displayed.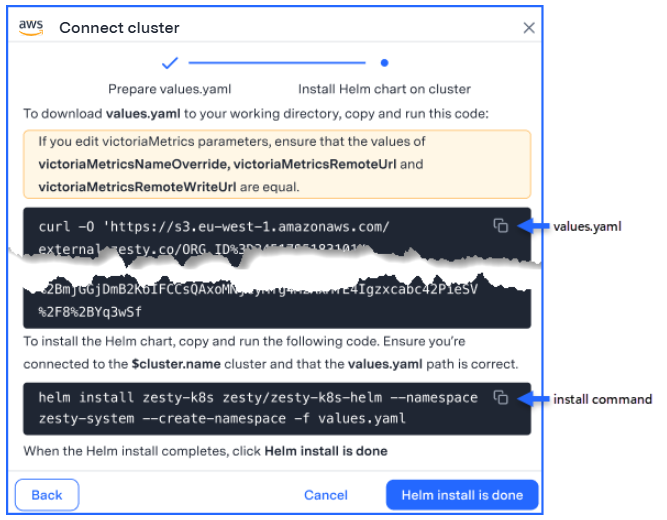
Install Helm chart on the cluster:
Download values.yaml to your terminal:
Click the copy icon for values.yaml and paste the code to the terminal.
Run the code to download the file.
After you download, you can use a file editor to edit values in the file, as described in step 2 of the previous section.
Configure the VictoriaMetrics mode (default: Single mode).
(Recommended) Edit the values of the Kompass Insights PVC size and the VictoriaMetrics server volume size.
Install the Helm chart:
Click the copy icon for the install command and paste the code to the terminal.
IMPORTANT
Before installing, ensure that you are connected to the correct cluster and that the path to Helm is correct.
Run the code to install the agent Helm chart.
When the Helm chart installation is complete, click Helm install is done.
A confirmation message is displayed.
Verify the deployment by running the following command:
kubectl get pods -n zesty-system
All Pods should reachRunningstatus within a few minutes.
Once the Insights agent is installed, Kubernetes optimization starts collecting cluster data.
For the Multi-dimensional autoscaling solution, it can take up to 24 hours before recommendations are displayed.
Kompass license
When you install the Kompass agent, Compute Optimization creates a Kubernetes Secret in the Zesty namespace to store the Kompass license information. Compute Optimization manages this Secret automatically.
This Secret is separate from the credentials Secret described in Advanced Kompass agent configuration.
For information about deleted or modified license information, see Troubleshoot the Kompass license.
Advanced Kompass agent configuration
The installation wizard generates the values.yaml file required to install the Kompass agent. In most cases, you can use the generated configuration without making additional changes.
Before installing the Helm chart, you can edit values.yaml to customize the agent configuration.
Configure credentials
The Kompass agent uses a credentials Secret (in addition to the license Secret) for the encrypted credentials required during installation. You can let the Helm chart create this Secret, or manage it independently using your own secret store (for example, Azure Key Vault, AWS Secrets Manager, or HashiCorp Vault).
Let Helm create the Secret
Configure values.yaml to enable secret creation and provide the encrypted credentials from Zesty.
kompass-insights:
  secret:
    create: true
    # Provide the credential value directly here
    # value: '<encrypted-credentials-provided-by-zesty>'
Use an existing Secret
Before installing the Helm chart, deploy the Secret to the zesty-system namespace. The Secret must contain the key ENCRYPTED_CREDENTIALS.
For example (Bash):
kubectl create namespace zesty-system

kubectl -n zesty-system create secret generic kompass-credentials \

--from-literal=ENCRYPTED_CREDENTIALS='<encrypted-credentials-provided-by-zesty>'
Then, remove the secret from the downloaded values.yaml and configure the Helm chart to use the existing Secret:
kompass-insights:
  secret:
    create: false
    name: kompass-credentials
Configure storage
You can configure the PVC storage class and storage sizes in values.yaml.
PVC storage class
Enter the name of the PVC StorageClass used by the agent.
If you do not know the name, run:
kubectl get storageclass
Kompass agent PVC size
For best performance, Zesty recommends setting the Kompass agent PVC size based on the number of workloads in the cluster:
Workloads | Recommended value |
|---|---|
Up to 1,000 |
|
1,000–5,000 |
|
5,000–10,000 |
|
Above 10,000 |
|
Configure the value in values.yaml:
kompass-insights:
  persistence:
    spec:
      resources:
        requests:
          storage: "1Gi"
VictoriaMetrics server volume size
Set the VictoriaMetrics server volume size based on the number of workloads in the cluster:
Workloads | Recommended value |
|---|---|
Up to 1,000 |
|
1,000–10,000 |
|
Above 10,000 |
|
Configure the value in values.yaml:
victoriaMetrics:
  server:
    persistentVolume:
      size: "30Gi"
Configure VictoriaMetrics
Zesty uses VictoriaMetrics to store and query cluster metrics.
VictoriaMetrics can run in Single-Pod mode or Cluster mode.
Single-Pod mode
Single-Pod mode is the default. It runs a standalone VictoriaMetrics instance.
This mode is suitable for small or non-production environments and provides no redundancy if the Pod becomes unavailable.
Set:
victoriaMetrics:
  enabled: true
victoriaMetricsCluster:
  enabled: false
victoriaMetricsAuth:
  enabled: true
  useSingle: true
Cluster mode
Cluster mode runs a multi-component VictoriaMetrics cluster with vmselect, vminsert, and vmstorage and multiple replicas.
This mode provides higher availability, fault tolerance, and scalability.
Cluster mode is recommended for:
production clusters
large clusters, for example, 100+ nodes or 1,000+ Pods
high-churn environments, where approximately 10% or more of workloads are Jobs, CI/CD pipelines, or other short-lived Pods
KEDA-heavy environments, where KEDA manages at least 10% of workloads
Set:
victoriaMetrics:
  enabled: false
victoriaMetricsCluster:
  enabled: true
victoriaMetricsAuth:
  enabled: true
  useSingle: false
Ensure the selected mode matches your environment’s availability and scalability requirements before installing the Helm chart.
If you edit VictoriaMetrics parameters, ensure that the values of these parameters are equal:
victoriaMetricsNameOverridevictoriaMetricsRemoteUrlvictoriaMetricsRemoteWriteUrl
Configure custom pricing
Use custom pricing to make the data in Compute Optimization more accurately reflect your environment.
Custom pricing applies to clusters outside AWS and Azure. AWS and Azure use public list pricing.
values.yaml contains the following default prices, in USD:
customPricing:
  cpu: 0.031611
  ram: 0.004237
  spotCpu: 0.006655
  spotRam: 0.000892
The parameters represent:
cpu: On-Demand price per vCPU-hourram: On-Demand price per GiB-hourspotCpu: Spot price per vCPU-hourspotRam: Spot price per GiB-hour
To use custom pricing, replace these values before installing the Helm chart.
Control where the agent runs
You can control the nodes on which the Kompass agent runs by configuring nodeSelector and tolerations in values.yaml, here.
View all Helm values
For a complete list of available Helm values, see the Kompass agent values.yaml file:
Troubleshoot the Kompass license
If the Kubernetes Secret that stores the Kompass license information is deleted, Compute Optimization automatically recreates it within a few minutes, with no impact on use.
If the Secret is modified, you can no longer use Kompass. Contact your CSM to recover access.
Uninstall the Kompass agent
To uninstall the agent, run the following Helm command:
helm uninstall <release-name> -n <namespace>