This topic describes how to automate backing up the EBS volumes in a Zesty Disk filesystem using the Amazon Data Lifecycle Manager.
For restore options, see Restore backed up Zesty Disk volumes.
Prerequisites
IAM role to the AWS account where the instance is configured that enables creating and managing AWS Data Lifecycle Manager.
To automate Zesty Disk backups:
Log in to the AWS Management Console.
From the EC2 menu, select Elastic Block Store > Lifecycle Manager.
Click Create lifecycle policy.
From the Schedule-based policy section, select EBS snapshot policy then click Next.
Configure the settings:
Select Instance as the target resource type.
Apply the policy to specific resources by entering the tags of instances running Zesty Disk).
Enter an easily identifiable Policy description, such as 'Zesty Disk backup for dev environment.'
Select an IAM role to be used by this policy.
Add a tag with these values: Key: ZestyDiskBU, Value: True
Note, this is not optional..png)
Set the Policy status as Enabled.
Ensure that the Exclude root volume checkbox is clear (unchecked).
Root must be included in the snapshot for restore to be successful.Click Next.
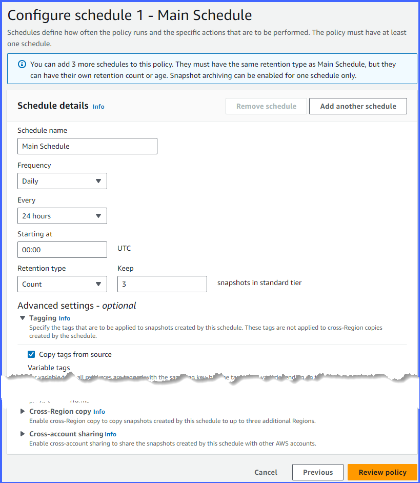
Configure a backup schedule (Min: 1).
In the following example, we created a new snapshot of each instance every 24 hours at 00:00 UTC, while always keeping the previous three snapshots.
In the Advanced settings section, select Copy tags from source.
This will add the ZestyDisk tag attached to all of your volumes to the snapshots, making it possible to easily filter for them later.
There are other options. Review them and decide whether to enable them.
Click Review policy.
Review policy details to ensure that they are correct.
(Optional) To create additional schedules, click Add another schedule.
Click Create policy.
Volumes that match the specified tags will be backed up automatically in accordance with this policy.