This topic describes how to use Helm to install the Kompass Insights agent. After installing the agent, the cluster is “connected” with Kompass.
The Kompass Insights agent (“agent”) provides visibility into your K8s cluster and workload costs, scaling performance, usage, and pattern history. With agent visibility, Kompass can make recommendations for your environment.
The agent requires read-only access to the services defined in the Insights agent YAML.
VictoriaMetrics settings
Kompass Insights uses VictoriaMetrics to store and query cluster metrics.
VictoriaMetrics can run in Single-Pod mode or Cluster mode, which determines the availability, resilience, and scalability of metrics storage and queries.
Single-Pod mode (default): runs a standalone VictoriaMetrics instance. This mode is suitable for small or non-production environments and provides no redundancy if the Pod becomes unavailable.
Cluster mode: runs a multi-component VictoriaMetrics cluster (
vmselect,vminsert, andvmstorage) with multiple replicas. This mode provides higher availability, fault tolerance, and scalability.
Cluster mode is recommended for:
production clusters
large clusters (for example, 100+ nodes or 1,000+ Pods)
high-churn environments, where approximately 10% or more of workloads are Jobs, CI/CD pipelines, or other short-lived Pods
KEDA-heavy environments, where KEDA manages at least 10% of workloads
You select the deployment mode by editing values.yaml, as described in the next section.
How the cluster connects to Kompass
This section describes the process of connecting a cluster to Kompass. The steps to do this are described in To install the Insights agent on an AWS cluster.
To connect to the agent, you install a Helm chart based on a values.yaml file.
When you click Connect from the Kompass > Clusters page, a wizard will prepare values.yaml as it guides you through the following steps:
Define specific values for the values.yaml file:
cert-manager (Mandatory): Is it installed or not?
If it’s not installed, Kompass will install it during the Helm chart installation.PVC storage class (Mandatory): The name of the PVC StorageClass.
The agent is installed with a PVC, so this is required.
If you don’t know the name, you can discover it by running this command:Kubectl get storageclassAuto update (Recommended): Enable automatic updating of your installed agent.
You can change these options:Version: Get bleeding edge updates instead of GA versions.
Time: Receive updates on a schedule instead of as soon as they are available.
You can see the full list of YAML parameters here.
Download values.yaml to your terminal.
At this point, you can make further modifications to values.yaml.For best performance with Kompass, we recommend modifying disk usage parameters for Kompass Insights PVC size and VictoriaMetrics server volume size.
For more information, click here.
Based on our experience, setting these disk usage parameters based on workloads in the cluster yields the best performance:
Parameter
Workloads and value
Code
Kompass Insights PVC size
Up to 1,000 workloads = 1Gi
From 1,000 - 5,000 workloads = 3Gi
From 5,000 - 10,000 workloads = 10Gi
Above 10,000 workloads = 100Gi
kompass-insights:
  persistence:
    spec:
      resources:
        requests:
          storage: “1Gi”
VictoriaMetrics server volume size
Up to 1,000 workloads = 30Gi
From 1,000 - 10,000 workloads = 60Gi
Above 10,000 workloads = 100Gi
victoriaMetrics:
  server:
    persistentVolume:
      size: "30Gi"
Set the VictoriaMetrics deployment mode in values.yaml:
To enable this mode
Set these values
Single mode
victoriaMetrics:enabled: truevictoriaMetricsCluster:enabled: falsevictoriaMetricsAuth:enabled: trueuseSingle: trueCluster mode
victoriaMetrics:enabled: falsevictoriaMetricsCluster:enabled: truevictoriaMetricsAuth:enabled: trueuseSingle: falseEnsure the selected mode matches your environment’s availability and scalability requirements before running the Helm installation. For more information, see VictoriaMetrics settings.
If you edit victoriaMetrics parameters, ensure that the values of these parameters are equal:
victoriaMetricsNameOverride,victoriaMetricsRemoteUrl, andvictoriaMetricsRemoteWriteUrl.You can control the nodes on which the Insights agent runs using the
nodeSelectorandtolerationsconfigurations, here.
Install the agent Helm chart, using the definitions in values.yaml.
You must be connected to the same cluster that you are connecting to the agent.Tell Kompass that you’re done!
Prerequisites
AWS account has been integrated with Zesty.
Kompass is installed in the cluster.
The administrator client on which the agent will be installed must be able to use the following:
Helm v3.14, or later
Required permissions
Agent permissions
To install the Insights agent on an AWS cluster:
From the Kompass > Clusters page, click Connect Insights agent on the row for the cluster to connect.
To connect multiple clusters, click Connect clusters.
The Connect cluster wizard is displayed.Select the cluster on which to install the agent.
When you start typing, matching clusters are displayed.Define parameter values:
cert-manager: If you select No, it will be installed.
PVC storage class
Agent auto-update (optional):
To edit the agent version and update time, click Edit auto update settings.
For more details about the parameters, see How the cluster connects to Kompass.Click Next.
The next step of the wizard is displayed.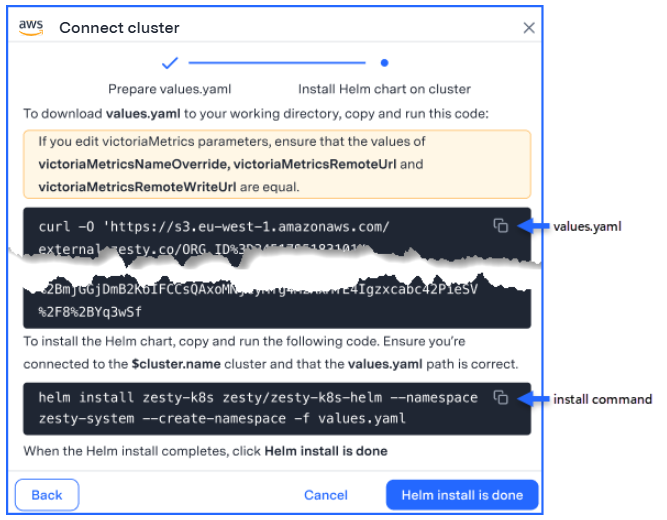
Download values.yaml to your terminal:
Click the values.yaml icon and paste the code to the terminal.
Run the code to download the file.
After you download, you can use a file editor to edit values in the file, as described in step 2 of the previous section.
Configure the victoriaMetrics mode (default: Single mode).
(Recommended) Edit the values of the Kompass Insights PVC size and the VictoriaMetrics server volume size.
Install the Helm chart:
Click the install command icon and paste the code to the terminal.
IMPORTANT
Before installing, ensure that you are connected to the correct cluster and that the path to Helm is correct.
Run the code to install the agent Helm chart.
When the Helm chart installation is complete, click Helm install is done.
A confirmation message is displayed.
Verify the deployment by running the following command:
kubectl get pods -n zesty-system
You should see one Pod running and then a second one.
Once the Insights agent is installed, Kompass starts collecting cluster data:
For Headroom reduction and Spot management solutions, it can take up to 2 days before recommendations are displayed.
For the Pod rightsizing solution, it can take up to 24 hours before recommendations are displayed.