This topic describes how to install the Insights agent on an Azure AKS cluster. After installing, the cluster is “connected” for Kubernetes optimization solutions.
The Insights agent (“agent”) provides visibility into your K8s cluster and workload costs, scaling performance, usage, and pattern history. With agent visibility, Kubernetes optimization can make recommendations for your environment.
The agent requires read-only access to the services defined in the Insights agent YAML.
Configure credentials for the agent installation
To securely install the Insights agent, you must provide encrypted credentials. You can let the Helm chart create the Kubernetes Secret (default), or you can manage the secret independently using your own secret store (for example, Azure Key Vault, AWS Secrets Manager, or HashiCorp Vault).
You configure this in values.yaml, as described in the drop-down box in How the cluster connects to Kubernetes optimization.
VictoriaMetrics settings
Insights uses VictoriaMetrics to store and query cluster metrics.
VictoriaMetrics can run in Single-Pod mode or Cluster mode, which determines the availability, resilience, and scalability of metrics storage and queries.
Single-Pod mode (default): runs a standalone VictoriaMetrics instance. This mode is suitable for small or non-production environments and provides no redundancy if the Pod becomes unavailable.
Cluster mode: runs a multi-component VictoriaMetrics cluster (
vmselect,vminsert, andvmstorage) with multiple replicas. This mode provides higher availability, fault tolerance, and scalability.
Cluster mode is recommended for:
production clusters
large clusters (for example, 100+ nodes or 1,000+ Pods)
high-churn environments, where approximately 10% or more of workloads are Jobs, CI/CD pipelines, or other short-lived Pods
KEDA-heavy environments, where KEDA manages at least 10% of workloads
You select the deployment mode by editing values.yaml, as described in the drop-down box in How the cluster connects to Kubernetes optimization.
How the cluster connects to Kubernetes optimization
To connect a cluster, use the installation wizard. The wizard has the following steps:
Permissions: provision Azure resources via Terraform
Prepare values.yaml: configure the Helm chart
Install Helm chart on cluster: deploy the agent
To see the details of how the wizard works, click here.
To connect to the agent, you install a Helm chart based on a values.yaml file.
The Connect cluster wizard will prepare values.yaml as it guides you through the following steps:
Use the Connect cluster wizard to create unique Terraform code to generate the Managed Identity’s Client ID. (You can see the Terraform template at https://github.com/zesty-co/terraform-kompass-insights-azure)
The client ID is needed to enable authentication between Kompass and Azure.
You can find the Subscription ID, Resource Group, and Cluster name in Azure.
The Resource group and Cluster name will be embedded inside the generated code.
When you run the code, it outputs the Managed Identity Client ID.Define specific values for the values.yaml file:
cert-manager (Mandatory): Is it installed or not?
If it’s not installed, it will be installed automatically during the Helm chart installation.PVC storage class (Mandatory): The name of the PVC StorageClass.
The agent is installed with a PVC, so this is required.
If you don’t know the name, you can discover it by running this command:kubectl get storageclassClient ID: the ID for which the Azure token is being requested.
This value is created by running the Terraform code.You can see the full list of YAML parameters here.
Download values.yaml to your terminal.
At this point, you can make further modifications to values.yaml.For best performance, we recommend modifying disk usage parameters for Kompass Insights PVC size and VictoriaMetrics server volume size.
Based on our experience, setting these disk usage parameters based on workloads in the cluster yields the best performance:Parameter
Workloads and value
Code
Kompass Insights PVC size
Up to 1,000 workloads = 1Gi
From 1,000 - 5,000 workloads = 3Gi
From 5,000 - 10,000 workloads = 10Gi
Above 10,000 workloads = 100Gi
kompass-insights:
  persistence:
    spec:
      resources:
        requests:
          storage: “1Gi”
VictoriaMetrics server volume size
Up to 1,000 workloads = 30Gi
From 1,000 - 10,000 workloads = 60Gi
Above 10,000 workloads = 100Gi
victoriaMetrics:
  server:
    persistentVolume:
      size: "30Gi"
Configure credentials
You can let Helm create the secret, or you can use an existing secret.Let Helm create the Secret
Configure values.yaml to enable secret creation and pass in the encrypted credentials provided by Zesty.
kompass-insights:
  secret:
    create: true
    # Provide the credential value directly here
    # value: '<encrypted-credentials-provided-by-zesty>'
Use an Existing Secret
The secret must be deployed to the
zesty-systemnamespace and contain the keyENCRYPTED_CREDENTIALSbefore running the Helm install.For example:
kubectl create namespace zesty-system
kubectl -n zesty-system create secret generic kompass-credentials \
  --from-literal=ENCRYPTED_CREDENTIALS='<encrypted-credentials-provided-by-zesty>'
Then, remove the secret from the downloaded values.yaml and replace it with the following.
Tell the Helm chart not to create the secret, and instead reference your existing secret’s name:
kompass-insights:
  secret:
    create: false
    name: kompass-credentials
Set the VictoriaMetrics deployment mode in values.yaml:
To enable this mode
Set these values
Single mode
victoriaMetrics:enabled: truevictoriaMetricsCluster:enabled: falsevictoriaMetricsAuth:enabled: trueuseSingle: trueCluster mode
victoriaMetrics:enabled: falsevictoriaMetricsCluster:enabled: truevictoriaMetricsAuth:enabled: trueuseSingle: falseEnsure the selected mode matches your environment’s availability and scalability requirements before running the Helm installation. For more information, see VictoriaMetrics settings.
If you edit VictoriaMetrics parameters, ensure that the values of these parameters are equal:
victoriaMetricsNameOverride,victoriaMetricsRemoteUrl, andvictoriaMetricsRemoteWriteUrl.You can control the nodes on which the Insights agent runs using the
nodeSelectorandtolerationsconfigurations, here.
Install the agent Helm chart, using the definitions in values.yaml.
You must be connected to the same cluster that you are connecting to the agent.Confirm that you’re done.
Prerequisites
The administrator client on which the agent will be installed must be able to use the following:
Agent permissions
To install the Insights agent on an AKS cluster:
The commands in this topic are written for Bash. If you use a different command-line shell, adapt the commands for that shell.
Permissions:
Run the Connect cluster wizard to create Terraform code:
From the Automations > Kompass > Clusters page, click Connect clusters.
.png)
Choose Azure from the cloud provider list.
The Connect cluster wizard begins, showing the Permissions tab..png)
Enter these Azure details:
Subscription ID: your Azure subscription GUID
Resource group: resource group that contains the AKS cluster
Cluster name: name of the AKS cluster
As you type, the Terraform code is updated with the cluster name and resource group.
Run Terraform to generate the client ID:
Create a dedicated directory for the Terraform configuration:
mkdir -p ~/kompass-insights-tf && cd ~/kompass-insights-tfCopy the Terraform code from the wizard and save it as main.tf in the new directory.
To see what the Terraform snippet does, click here.
Code
Description
provider "azurerm" / provider "azuread"Authenticates Terraform to your Azure subscription and Azure AD tenant.
data "azurerm_kubernetes_cluster"Reads the existing AKS cluster to extract the
oidc_issuer_url, which is needed for Workload Identity.data "azurerm_resource_group"Reads the resource group to obtain its location and name for the managed identity.
module "kompass_insights"Calls the
zesty-co/insights-azure/kompassTerraform module. It creates a User Assigned Managed Identity, a Federated Identity Credential (binds the identity to the AKS OIDC issuer), a Custom Role Definition with minimal read permissions, and a Role Assignment.output "managed_identity_client_id"Outputs the Client ID of the created Managed Identity, which is needed in the next step
Apply the Terraform configuration:
terraform initterraform planterraform applyAt the prompt, type
yes.
Copy the client ID for the next step.
If the client ID is not displayed, run this:terraform output managed_identity_client_idFrom the Connect cluster wizard, click Next.
The Prepare values.yaml tab is shown.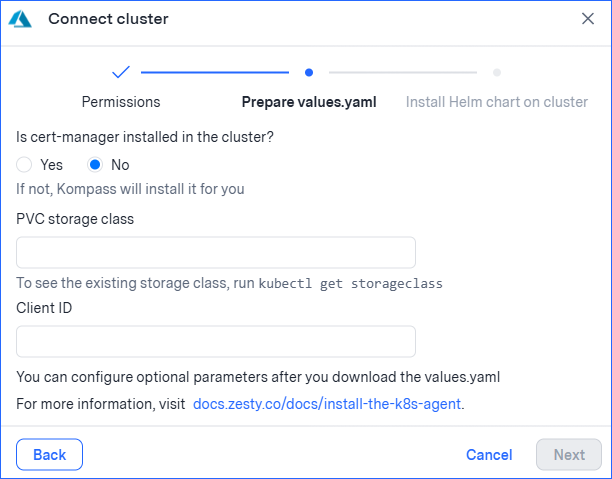
Prepare values.yaml:
(For more details about these parameters, see How the cluster connects to Kubernetes optimization.)Is cert-manager installed in the cluster?
If cert-manager (https://cert-manager.io/) is running in the cluster, select Yes.
If not, select No; it will be installed automatically.
If you don’t know whether cert-manager is installed, click here.
To see if cert-manager is installed, run this:
kubectl get pods -A | grep cert-managerIf the command returns running pods, select Yes; otherwise leave the default No.
PVC storage class: The agent is installed with a PVC, so a storage class is required.
To list the available storage classes in your cluster, run
kubectl get storageclassOn AKS, the typical choice is
- default – Azure Disk (Standard HDD)Do not use
azurefile-*classes — the agent requires a block-storageReadWriteOncevolume.Client ID: Paste the value of
managed_identity_client_idfrom the Terraform output.Click Next.
The Install Helm chart on cluster tab is shown.
The wizard provides 2 Bash commands: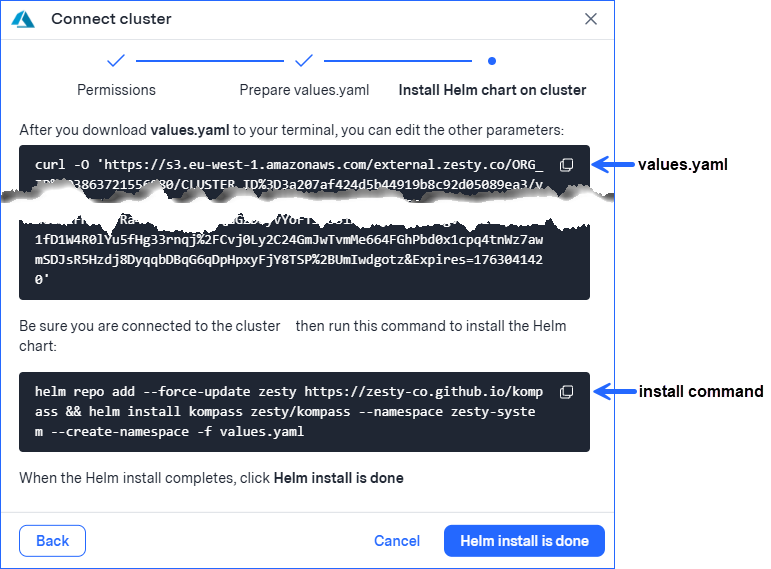
Install Helm chart on the cluster:
Click the copy icon for the values.yaml command and paste the code to the terminal.
Run the code to download values.yaml.
After you download, you can use a file editor to edit values in the file, as described in the dropdown details of How the cluster connects to Kubernetes resource optimization.
Configure the VictoriaMetrics mode (default: Single mode).
(Recommended) Edit the values of the Kompass Insights PVC size and the VictoriaMetrics server volume size.
Click the copy icon for the install command and paste the code to the terminal.
IMPORTANT
Before installing, ensure that you are connected to the correct cluster and that the path to Helm is correct.
Run the code to install the agent Helm chart.
When the Helm chart installation is complete, click Helm install is done.
A confirmation message is displayed.
Verify the deployment by running the following command:
kubectl get pods -n zesty-system
All Pods should reachRunningstatus within a few minutes.
Once the Insights agent is installed, Kompass starts collecting cluster data:
For the Pod rightsizing solution, it can take up to 24 hours before recommendations are displayed.