This topic describes how to integrate (“onboard”) multiple AWS accounts (the master payer/Organization Management account and member/subaccounts) into Zesty using StackSets.
Integrating with StackSets creates an IAM role for all subaccounts that the Org Management account sees. Because the subaccounts are created with the Zesty IAM role already in place, they are automatically integrated into the Zesty platform.
Prerequisites
Access to the master payer account in your AWS Management Console
Permissions to use StackSets in your AWS Management Console
Trust relationship in place between the Org Management account and subaccounts for StackSet deployment
User access to the Zesty platform
To integrate accounts using StackSets:
Log in to your AWS Management Console.
In a separate tab, log in to the Zesty platform.
From the Zesty platform main menu, select Organization Settings > Accounts.
The Accounts page displays existing accounts.
Click Add account.
The Create new account wizard begins.
(You will not be completing the wizard, just using it to launch another screen.)On the Choose provider page of the Create new account wizard, click AWS.
Configure permissions:
This step uses CloudFormation to configure permissions for Zesty.In Step 1 (Permission presets), do the following:
If you are configuring Zesty Disk, select Zesty Disk.
You can select other permissions, too.If you are configuring Commitment Manager, select Read-only.
This will automatically select the read-only Databases, S3, and EKS.
You can select other permissions, too.
In Step 2 (CUR), select I will provide the CUR later.
If you have already enabled CUR, you can select I have a CUR report already enabled and then enter the S3 bucket name.In Step 3, select a region in which to create the stack.
Your choice in this step is not relevant.In Step 4, approve the permissions to be assigned to the IAM role.
In Step 5, click Create IAM role.
The AWS Quick create stack page is displayed: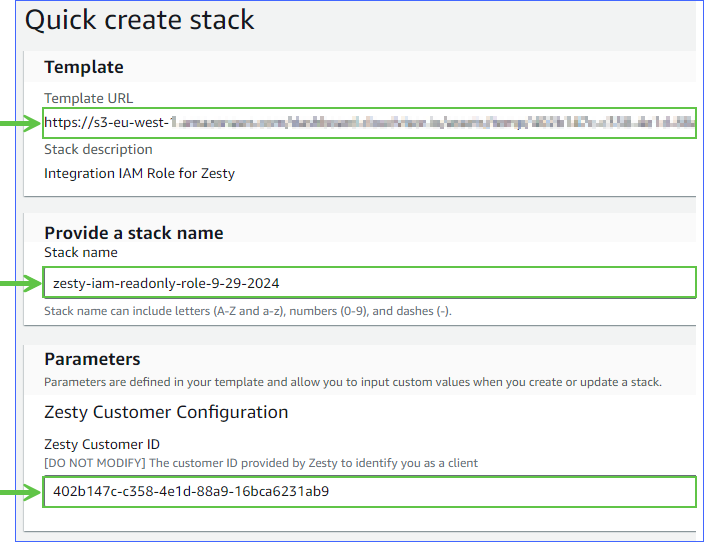
From this page, you will need the Template URL, Stack name, and the Zesty ID Customer ID later.
You can copy those to a temporary file or just leave this tab open for copying.
Do not click Create stack at the bottom of the page.
Create the StackSet:
Return to the tab where the AWS Management Console was opened.
Go to the CloudFormation > StackSets page.
You can find this using the menu or by typing Cloudformation in the search box.In the top right of the page, click Create StackSet.
The Create StackSet wizard is displayed.In Step 1 - Choose a template, do this:
Scroll down to Prerequisite - Prepare Template and select Template is ready.
In the Specify template section, select Amazon S3 URL as the source and then paste the Template URL from step 6f into Amazon S3 URL.
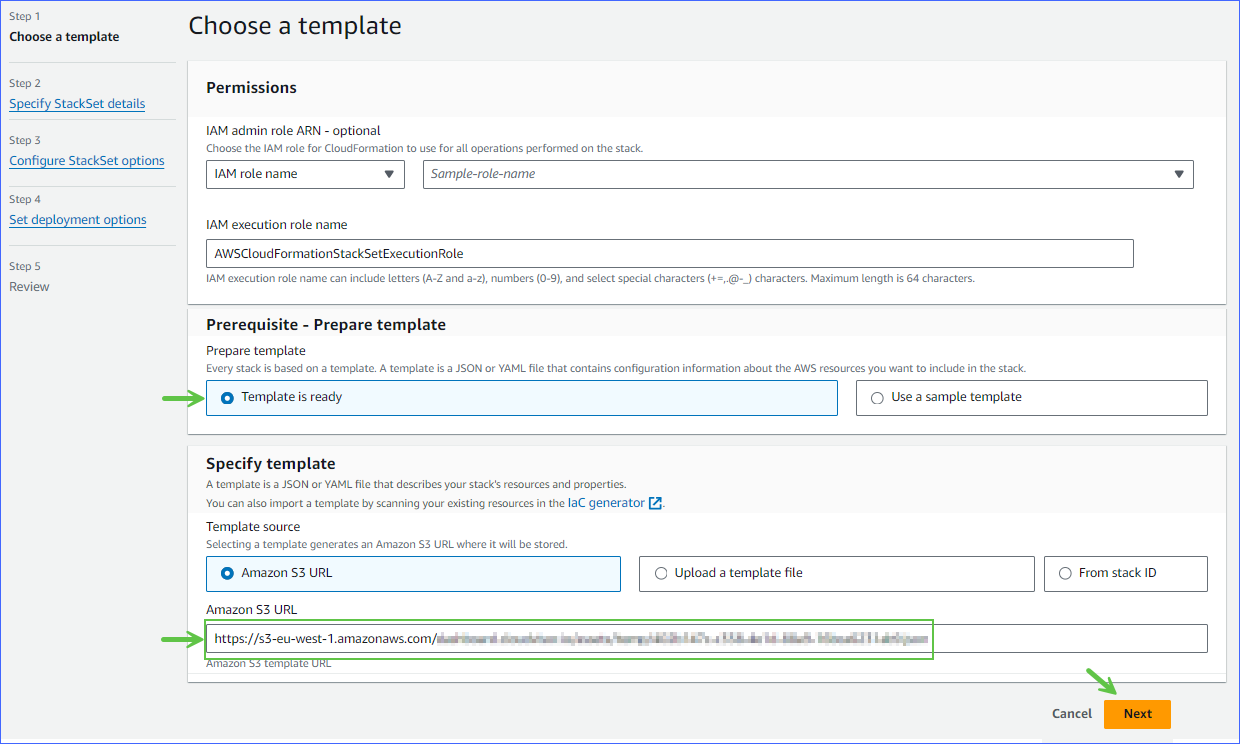
Click Next
In Step 2 - Specify StackSet details, do this:
In the StackSet name section, paste the Stack name name from step 6f.
You can enter a different name, if you prefer.(Optional) Enter a description.
In the Parameters section, paste your Zesty Customer ID from step 6f.
You will need this ID later in the procedure, too.Click Next.
In Step 3 - Configure StackSet options, do this:
In the Execution configuration section, select Inactive.
Click Next.
In Step 4 - Set deployment actions, do this:
Scroll down to the Specify regions section.
Select the regions in which to deploy the StackSet.
The role can be deployed outside of the specified region and you do not need to create additional StackSets for this.Scroll down and click Next.
In Step 5, review the settings, then click Run.
The new StackSet should be displayed within a few moments on the StackSets page.
Send the StackSet permissions to Zesty:
Click the name of the newly-created StackSet to view the associated metadata.
Click the Template tab.
The StackSet permissions are displayed.Click Copy to Clipboard.
Paste the following into a message and send it to your Customer Service Manager:
The copied StackSet permissions
Your Customer ID from step 6f
Close the Zesty Create new account wizard and the AWS Quick create stack pages.
The CSM will do the account integration and contact you when that is complete.