This topic describes how to manually extend a ZFS-based Zesty Disk filesystem.
Manual actions may be reverted automatically by the Zesty Disk backend according to the Zesty Disk algorithm and the state of the filesystem.
You can extend in the following ways:
Extend a volume that is already part of a Zesty Disk filesystem
This section describes how to manually extend a ZFS filesystem by extending a volume that is part of that filesystem.
Prerequisites
Login access to the Zesty platform
Root CLI access to the instance, for example by using SSH
Access to the AWS console with IAM permissions to modify an existing EBS volume
Limitations
To see the AWS requirements for modifying an EBS volume, see Requirements for Amazon EBS volume modifications. After modifying a volume, that volume cannot be further modified for at least six hours.
To extend a volume:
From the Zesty platform, select Zesty Disk.
In the Managed filesystems tab, select the filesystem to extend.
The filesystem disk details and devices are displayed.
From the Overview tab, identify the relevant EBS volume to increase.
Use the value in the Volume ID column to identify the volume in the AWS console.
Extend the EBS volume in your AWS console, as described in Request Amazon EBS volume modifications.
Connect to the instance with CLI root access.
Identify the pool name by running the following command:
zfs list
Output similar to the following is displayed:
Identify the device name of the extended device by running the following command:
ls -l /dev/disk/by-id/ | grep <id>
Where <id> is the ID number (only) of the AWS volume ID.
Output similar to the following is displayed: Find the device name that aligns with the volume ID (from step 3). In our example, the device name is nvme8n1.
Instruct the ZFS filesystem to expand the pool by running the following command:
zpool online -e <pool_name> <device_name>
Example:zpool online -e mnt nvme8n1This command updates the capacity that ZFS uses to the maximum available capacity for the volume in the ZFS pool.
Where:<pool_name>is the name identified in step 6<device_name>is the name identified in step 7
(Optional) You can see the new pool capacity by running the
zpool listcommand.
Add a new EBS volume
This section describes how to manually extend a ZFS filesystem by adding a new EBS volume to the filesystem.
Prerequisites
Login access to the Zesty platform
Root CLI access to the instance, for example by using SSH
Access to the AWS console with IAM permissions to create a new EBS volume and attach it to an existing EC2 instance. (If you are using KMS for encrypting the volume, additional permissions might be required.)
Limitations
AWS limits the amount of EBS volumes that can be attached to an EC2 instance, as described in Amazon EBS volume limits for Amazon EC2 instances.
To add a new volume:
From the AWS console, create a new EBS volume with the desired size following these guidelines:
Create the volume in the same region and availability zone as the instance.
Copy all the AWS tags from an existing volume on this EC2 instance to the new volume.
Note the ID of the new volume. You will need it in a later step.
For more details, see Create an Amazon EBS volume.
Attach the volume to the instance.
For more information, see Attach an Amazon EBS volume to an Amazon EC2 instance.
Connect to the instance with CLI root access.
Identify the device path of the new attached EBS:
Run the following command:
lsblk -o NAME,SERIAL,MOUNTPOINT -n | awk '$2 ~ /^vol/ {print $1,$2}' | sed s/vol/vol-/g
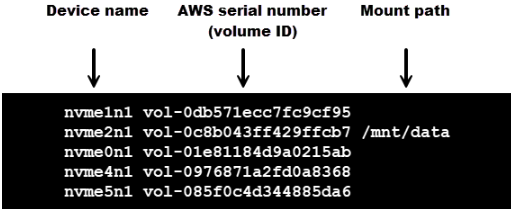
The output contains pairs of device names and the corresponding AWS volume IDs. For example:
Identify the device name that is associated with the EBS volume. In our example, the created volume ID (from AWS) is “vol-0db571ecc7fc9cf95,” so the device name is /dev/nvme1n1.
Add the new device to the ZFS pool by running the following command:
zpool add <pool_name> <device_name>
Example:zpool add zdata /dev/nvme1n1(Optional) You can see the new pool capacity by running the
zpool listcommand.