This topic describes how to run EZswitch on a Linux instance from the zestyctl CLI.
Before beginning EZswitch, ensure that your environment is supported, as described in the “Limitations” section of How EZswitch works on standalone instances.
This topic describes the basics of how to use the zestyctl CLI to run EZswitch. For more options and a full description of the zestyctl disk ezswitch commands, see zestyctl disk ezswitch commands.
Prerequisites
User access to the Zesty platform and the Zesty API Key
For more information, see Find your Zesty API key.AWS account is integrated with Zesty Disk
For more information, see Integrate and onboard your AWS account with Zesty.A mounted volume (the source filesystem) with data to be migrated
Root CLI access (for example, using SSH) to the instance with the source filesystem
To run EZswitch from the zestyctl CLI:
Connect to the instance with CLI root access.
Install the latest Zesty Disk Agent by running the following command:
curl -s https://static.zesty.co/ZX-InfraStructure-Agent-release/install.sh | sudo bash -s apikey=<API_KEY>Verify that EZswitch supports the source filesystem by running the following command:
zestyctl disk ezswitch analyze <mount_path>
Where<mount_path>is the mount path of the source filesystem.The analysis checks for problems that can prevent the migration from completing successfully. If errors are displayed, solve them before continuing.
Start EZswitch by running the following command:
zestyctl disk ezswitch start <mount_path> --auto-reboot
Example:zestyctl disk ezswitch start /mnt/data --auto-reboot
Where:<mount_path>is the mount path to be migrated(Optional) To reboot the instance automatically, add
--auto-reboot
(Optional) To check the status of the migration, run the following command:
zestyctl disk ezswitch statusOutput similar to the following is displayed:
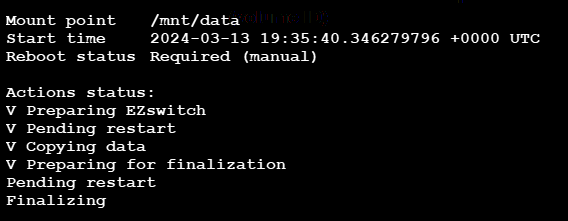
In this example, the reboot is done manually, 4 steps were completed so far, and the migration is currently paused until a reboot is done. You can reboot using the CLI, from AWS, or from the Zesty platform.
After the reboot, the migration will resume from the same point.
The old EBS volume is automatically detached from the instance.When the migration completes, running the status command will return the following output:
No ezswitch is running(Optional) You can cancel an EZswitch migration either from the Managed filesystems tab of the Zesty Disk platform or by running the following command:
zestyctl disk ezswitch abort <mount_path>
Canceling will stop the copying of data to the destination disk, unmount the destination disk, and revert all system settings.Important: Canceling a migration is only allowed before the first reboot.
When the migration completes, the filesystem will be marked in the Managed filesystems tab to show that it is being managed by Zesty Disk:
.png)
Congratulations. Your data is now being managed by Zesty Disk!