This topic describes how to create an AWS Cost and Usage Report (CUR) and store it in an S3 bucket.
After you create the CUR, you can upload it to the Zesty platform, as described in Integrate and onboard an AWS account with Zesty.
If your organization already has a CUR that meets the Zesty configuration criteria, you can integrate that immediately rather than creating a new CUR.
If your CUR doesn’t contain enough historical data, you can backfill historical data before uploading it, as described in Backfill data into a CUR.
Prerequisites
Access to the Management account (formerly known as Master Payer account) in your AWS Management Console
AWS permissions to create a CUR and S3 buckets
Select the tab for Legacy CUR or CUR v2.0:
Procedure
Log in to your AWS Management Console.
From the AWS console, go to Billing and Cost Management.
You can find that using the search bar.
In the left menu, under Cost and Usage Analysis, select Data Exports.
Click Create.
The Create export page is displayed. On this page you customize the CUR with the criteria required by Zesty.
Customize the CUR:
After these steps, there is a screenshot that matches the described steps.
For Export type, select Legacy CUR export.
For Export name, type a name.
We recommend a name like zesty-<yourbusinessname> that is unique and easily identifiable.
In the Export content section, for Additional export content, select Include resource IDs.
Leave Data refresh settings blank.
In the Data export delivery options section, select the following:
For Report data time granularity, select Hourly.
For Report versioning, select Overwrite existing.
For Report data integration, do not select any options.
For a CUR that is to be integrated with Athena, select the Amazon Athena integration.For Compression type, select Parquet.
In the Data export storage setting section, click Configure.
The Configure S3 bucket dialog is displayed.
In the Configure S3 bucket dialog make the following customizations:
Select Create a bucket.
Type a valid S3 bucket name.
We recommend using the same name as the Export name.
If you plan to integrate your CUR in the Zesty platform, copy the bucket name so you have it handy.
Select the region in which the bucket will reside.
Click Create bucket.
On the Create export page, your S3 bucket name is now displayed.
Add an S3 path prefix.
The path prefix enables organization and structure within the S3 bucket.
(Optional) You can add tags.
Click Create report.
The following screenshot shows a completed Create export page: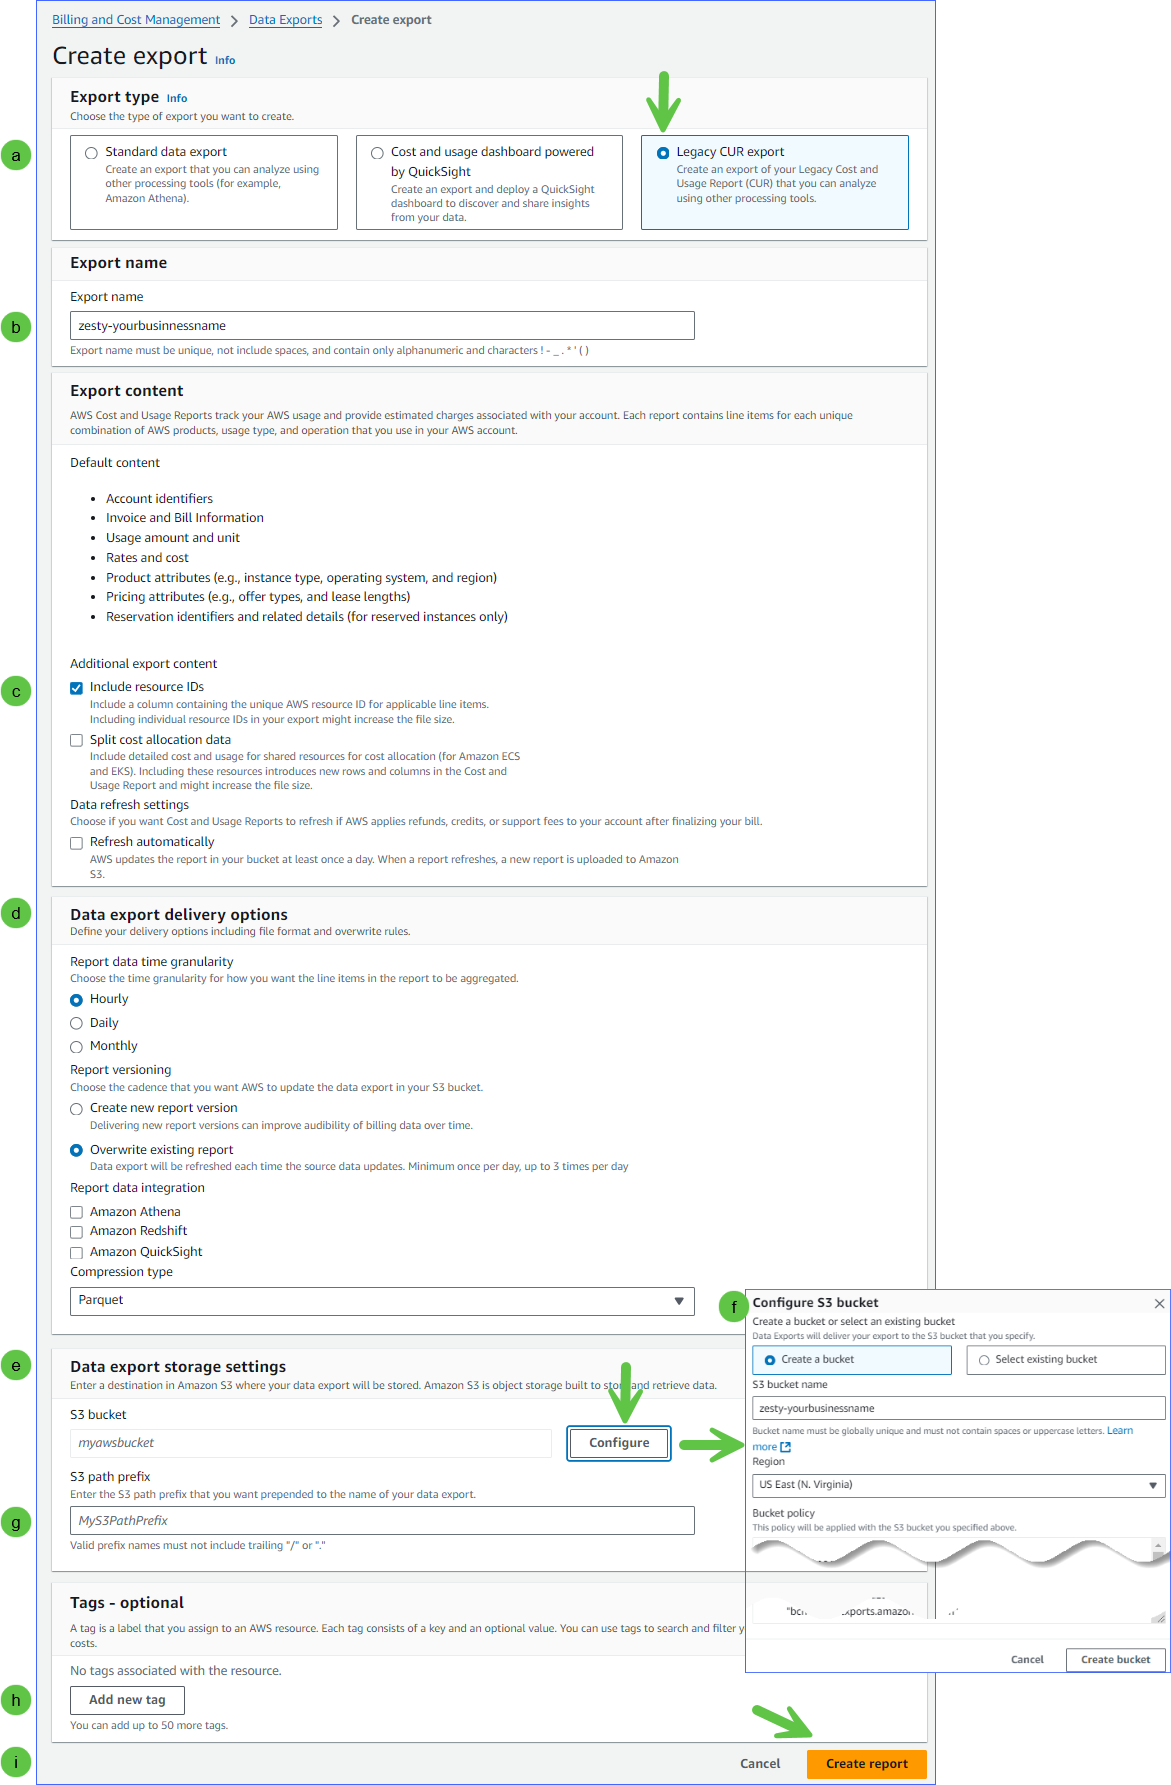
It can take up to 24 hours before AWS starts to deliver the CUR to the S3 bucket.
Procedure
Log in to your AWS Management Console.
From the AWS console, go to Billing and Cost Management.
You can find that using the search bar.In the left menu, under Cost Analysis, select Data Exports.
Click Create.
The Create export page is displayed. On this page you customize the CUR with the criteria required by Zesty.Customize the CUR:
After these steps, there is a screenshot that matches the described steps.For Export details, select Standard data export.
For Export name, type a name.
We recommend a name like zesty-<yourbusinessname> that is unique and easily identifiable.For data table content settings, select CUR 2.0.
For Additional export content, select Include resource IDs.
For Time granularity, select Hourly.
For Compression type and file format, select Parquet.
For File versioning, select Overwrite existing data export file.
In the Data export storage setting section, configure an S3 bucket:
Click Configure.
In the Configure S3 bucket dialog make the following customizations:Select Create a bucket.
Type a valid S3 bucket name.
We recommend using the same name as the Export name.
If you plan to integrate your CUR in the Zesty platform, copy the bucket name so you have it handy.Select the region in which the bucket will reside.
Click Create bucket.
On the Create export page, your S3 bucket name is now displayed.
Add an S3 path prefix.
The path prefix enables organization and structure within the S3 bucket.(Optional) You can add tags.
Click Create.
The following screenshot shows a completed Create export page: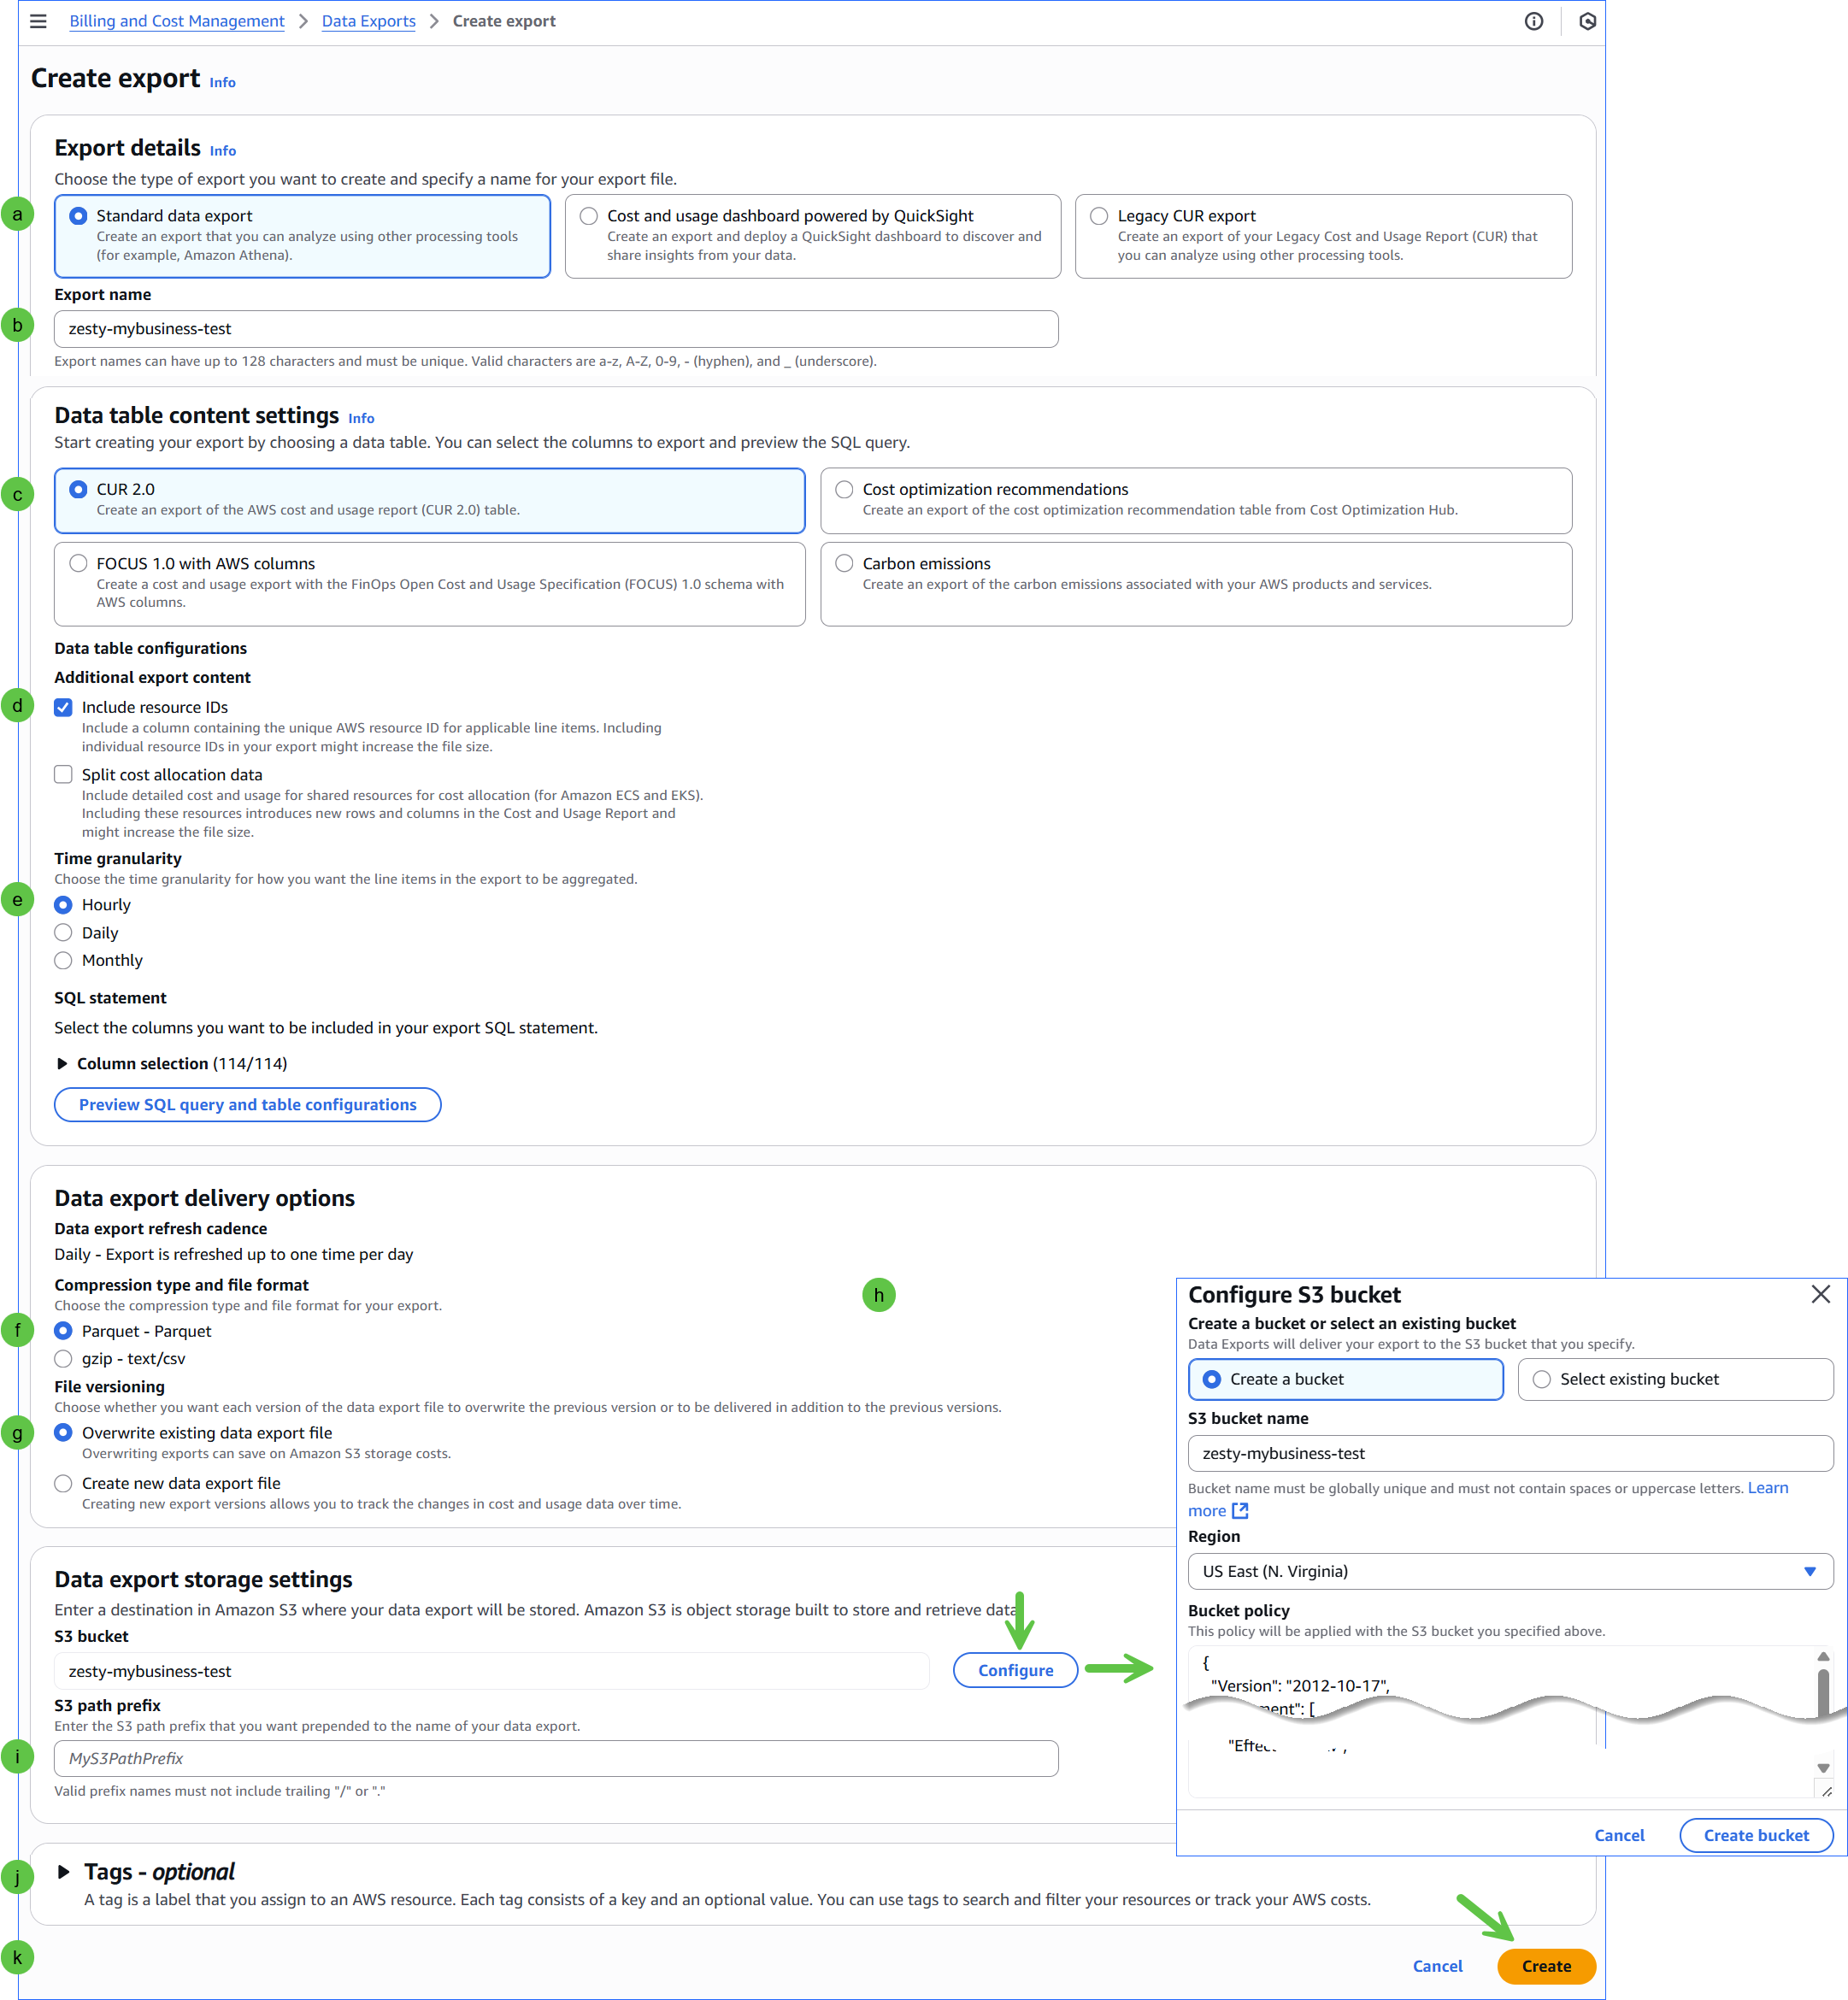
It can take up to 24 hours before AWS starts to deliver the CUR to the S3 bucket.
After the CUR is available, you can integrate (“onboard”) it with Zesty or you can backfill it with historical data as described in Backfill data into a CUR.