Move volumes to a different instance
This topic describes how to move all the volumes in a Zesty Disk filesystem from one instance to another.
You can move volumes in the following filesystems:
Move volumes in a Btrfs filesystem
This section describes how to move all the volumes in a Btrfs filesystem from one Amazon Linux 2 instance (source) to another (target).
Note: This procedure requires stopping the source and target instances. You may want to plan to do this during a maintenance window.
Prerequisites
User access to the Zesty platform
AWS permission level: AmazonEC2FullAccess
Root CLI access to the source and target instances
To move volumes in a Btrfs filesystem:
From the Zesty platform main menu, select Zesty Disk.
Prepare the target instance mount point:
Connect to the target instance with CLI root access (for example using SSH or Putty).
Install the Zesty Disk agent as described in Install the Zesty Disk Agent.
Create a mount point for the new Zesty Disk filesystem, using the following command:
mkdir <mount point>
The target mount point should be identical to the source mount point. For example, if the source mount point is /mnt/data/, runmkdir /mnt/data/
Copy the Zesty Disk mount point metadata:
Connect to the source instance with CLI root access (for example using SSH or Putty).
Open the /zesty directory.
Using a file editor (like Nano or Vim), copy the contents of the zesty-disk-mountpoints file.
On the target instance, open the /zesty directory.
Using a file editor, open the zesty-disk-mountpoints file and paste (and overwrite) the content copied from this file on the source.
Shut down the source instance.
Shut down the target instance.
Identify the volumes to be moved:
In the Zesty Disk platform, from the Zesty Disk > Managed Filesystems page, select the source Zesty Disk filesystem (whose volumes are to be moved).
The filesystem properties are displayed.From the Overview tab, manually copy the volume IDs to a temporary file:

Detach the volumes from the source instance:
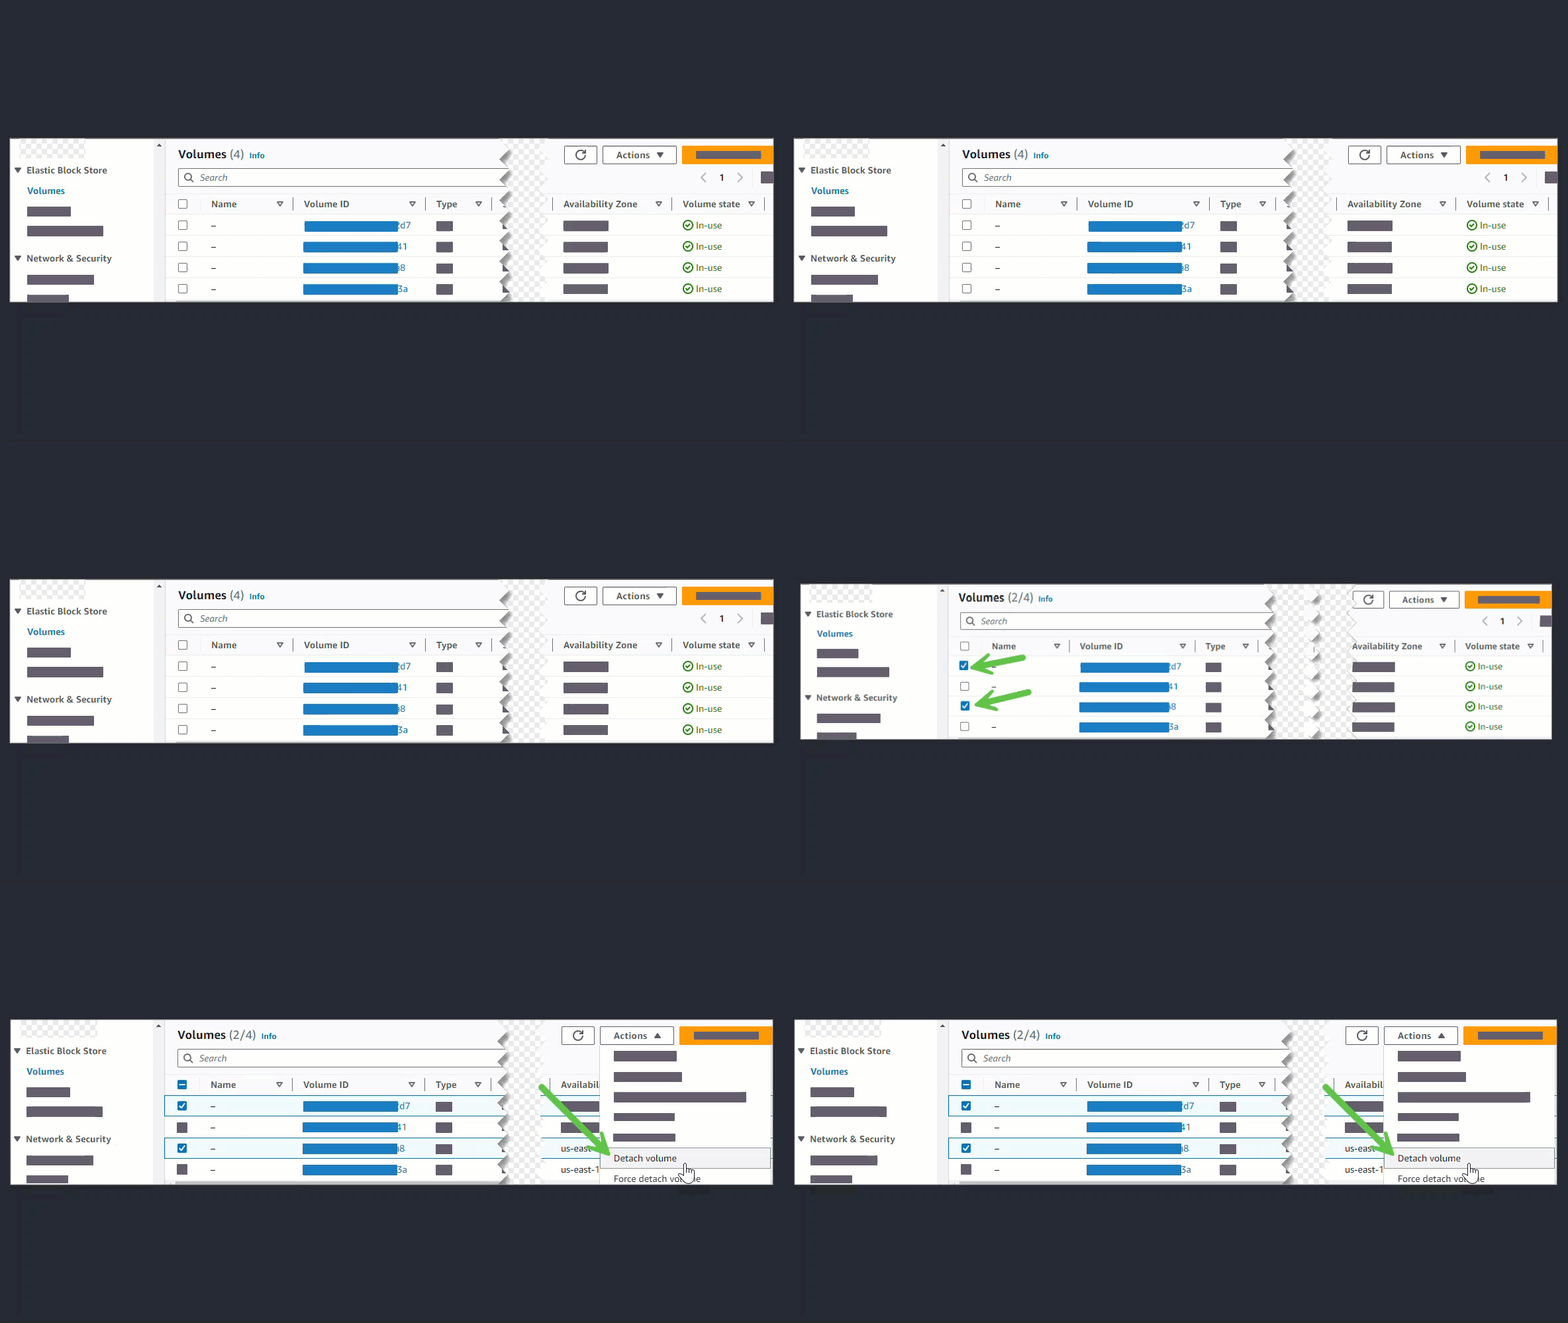
From the AWS console, navigate to the EC2 dashboard Elastic Block Store > Volumes page.
Find and choose the volumes identified in the Zesty Disk platform.

From the Actions drop-down menu, select Detach volumes, then confirm.
When the volume is detached, its value in the Volume state column changes from “In-use” to “Available.”
Attach the volumes to the target instance:
From the Elastic Block Store > Volumes page, find and choose the same volumes that were detached from the source instance (originally identified in the Zesty Disk platform).
From the Actions drop-down menu, select Attach volumes.
Select the ID of the target instance, select the mount path created in step 2, then confirm.
Start the target instance.
To confirm that the volumes are now attached to the target instance, run either of the following commands from the target instance:
lsblk (or fdisk -l)
Move volumes in a ZFS filesystem
This section describes how to move all the volumes in a ZFS filesystem from one instance (source) to another (target).
Note: This procedure requires stopping the source and target instances. You may want to plan to do this during a maintenance window.
Prerequisites
User access to the Zesty platform
AWS permission level: AmazonEC2FullAccess
Root CLI access to the source and target instances
To move volumes in a ZFS filesystem:
From the Zesty platform main menu, select Zesty Disk.
Prepare the target instance mount point:
Connect to the target instance with CLI root access (for example using SSH or Putty).
Install the Zesty Disk agent as described in Install the Zesty Disk Agent.
Create a mount point for the new Zesty Disk filesystem, using the following command:
mkdir <mount point>
The target mount point should be identical to the source mount point. For example, if the source mount point is /mnt/data/, runmkdir /mnt/data/
Discover the Zesty Disk filesystem storage pool name and device list:
Connect to the source instance with CLI root access (for example using SSH or Putty).
Display the storage pool name, by running the following command:
zpool list -vCopy the storage pool name to a temporary file.
Shut down the source instance.
Shut down the target instance.
Identify the volumes to be moved:
In the Zesty Disk platform, from the Zesty Disk > Managed Filesystems page, select the source Zesty Disk filesystem (whose volumes are to be moved).
The filesystem properties are displayed.From the Overview tab, manually copy the volume IDs to a temporary file:

Detach the volumes from the source instance:
From the AWS console, navigate to the EC2 dashboard Elastic Block Store > Volumes page.
Find and choose the volumes identified in the Zesty Disk platform.

From the Actions drop-down menu, select Detach volumes, then confirm.
When the volume is detached, its value in the Volume state column is “Available.”
Attach the volumes to the target instance:
From the Elastic Block Store > Volumes page, find and choose the same volumes that were detached from the source instance (originally identified in the Zesty Disk platform).
From the Actions drop-down menu, select Attach volumes.
Select the ID of the target instance, select the mount path created in step 2, then confirm.
Start the target instance.
On the target instance, import the storage pool by running the following command:
zpool import <pool name>
Where <pool name> is the name discovered in step 3.To confirm that the volumes are now attached to the target instance, run the following command:
zpool list -v